My First React App
It's about time we showed you how to make use of all this, wouldn't you think?
In this tutorial, we are going to create a custom schema through the Admin Panel and build a fairly basic frontend app capable of:
- Registering new users
- Authenticating our users
- Creating entries for a custom schema
- Retrieving schema entries
Your backend is capable of working with any stack of your choice.
Yet, for the purpose of keeping things simple, this guide is going to focus solely on building a React app using Conduit's REST API.
Prerequisites
Before you start this tutorial, make sure you've read our Getting Started Guide.
Our app is going to make use of the following modules:
Let's bootstrap our Conduit installation using the automated container-based installation option.
You can read more on that as well as alternative installation methods here.
- CLI
npx @conduitplatform/cli deploy setup
At this point, you should be greeted by Conduit's admin panel.
You'll have to log into your admin panel, head to the Database section and create a new schema to be used by your application.

Suppose we're building a simple web application where users can register and update a film's details.
We'll be creating a custom Movies schema for our users to operate on.
Let's introduce a unique name text field for our movies, as well as a director text field,
a numeric duration and a releaseDate field represented as a date field.
Notice how our schema comes with a unique id as well as creation and modification timestamps out of the box.
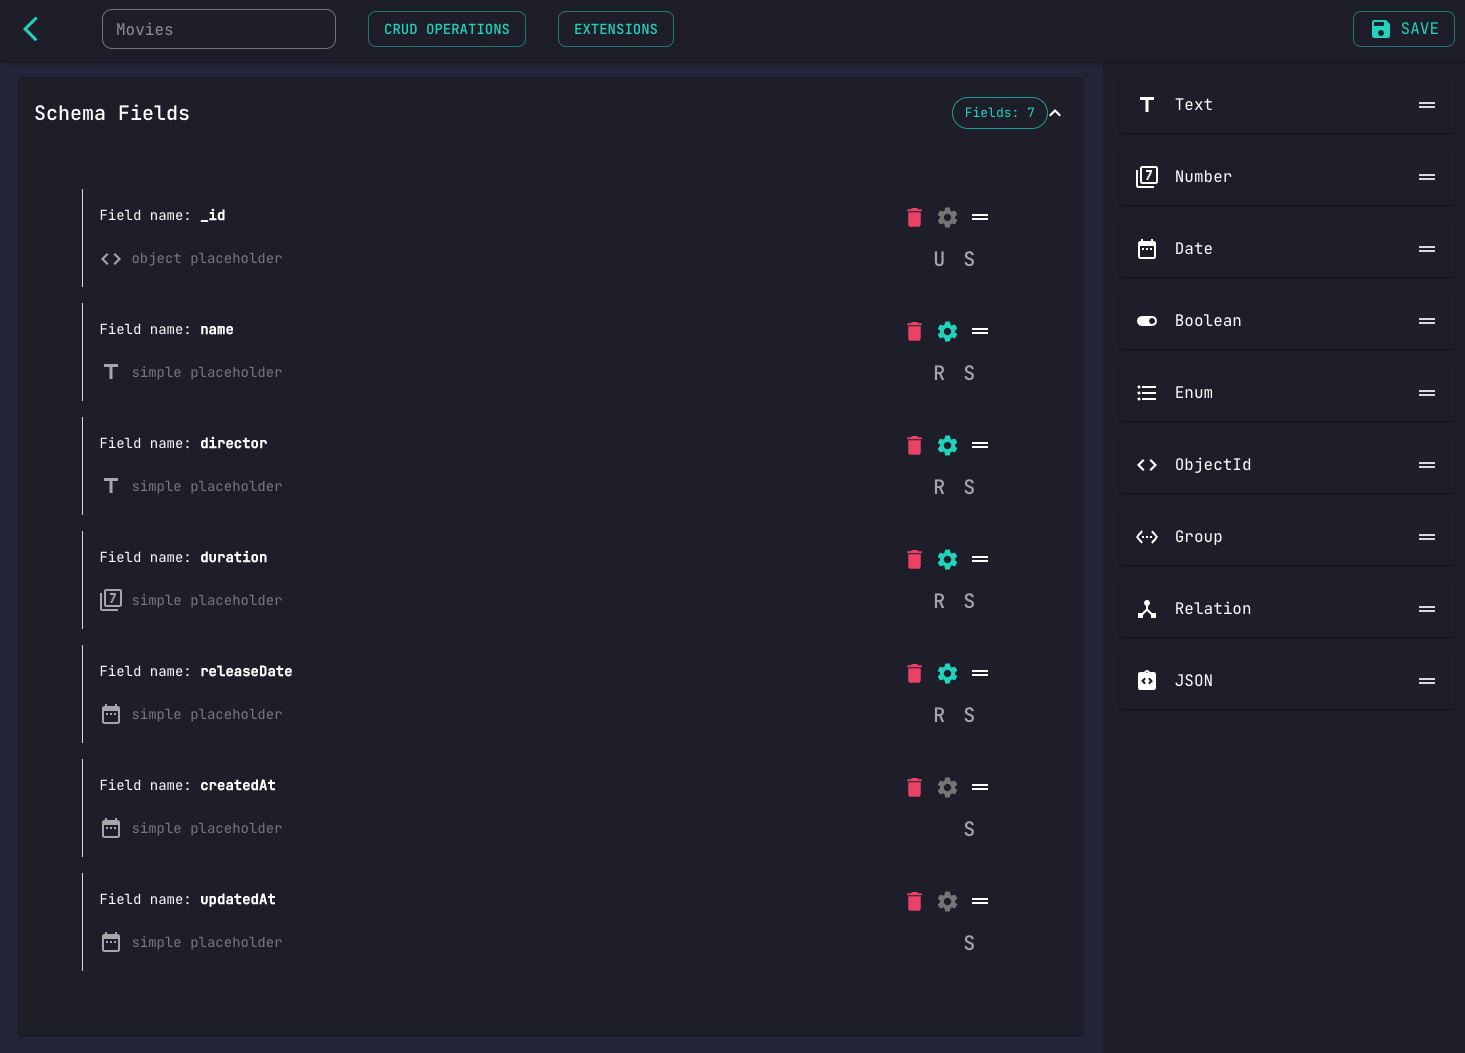
So as not to overcomplicate things through the introduction of additional schemas, we won't be using any relation fields or restrict who can modify these details. We're just gonna trust our fellow community members and let any authenticated user update these entries at this time.
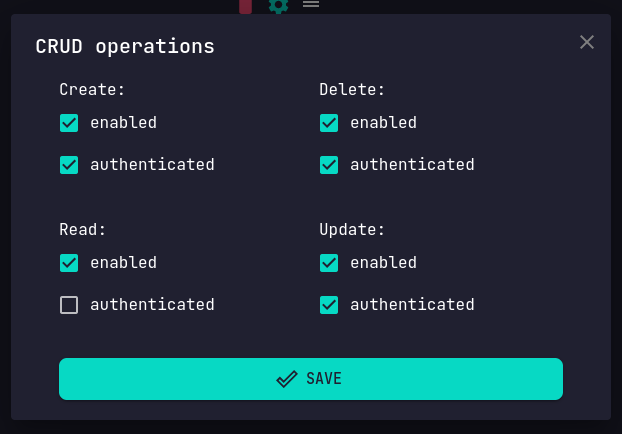
We're gonna modify our schema's CRUD operations configuration.
For our example, you're going to have to make sure Create and Read operations are both enabled.
We want our movies to be retrievable by guests, so verify that Read operations are not authenticated.
Feel free to step this up a notch and experiment with your own complex schemas.
Doing so through the schema editor should be a breeze.
App Initialization
Let's initialize our React app.
npx create-react-app my-app
cd my-app
mkdir src/components
npm install react-router-dom
PORT=3050 CONDUIT_CLIENT_PORT=3000 npm start
User Registration
Our users are going to need a way for them to register themselves.
Let's create a registration page component.
import React, { useState } from 'react';

const PORT = process.env.CONDUIT_CLIENT_PORT ?? 3000;

async function registerUser(credentials) {
  return fetch(`http://localhost:${PORT}/authentication/local/new`, {
    method: 'POST',
    headers: {
      'Content-Type': 'application/json',
    },
    body: JSON.stringify(credentials),
  })
    .then(data => data.json());
 }

export default function Register() {
  const [email, setEmail] = useState();
  const [password, setPassword] = useState();
  const handleSubmit = async e => {
    e.preventDefault();
    const token = await registerUser({
      email,
      password,
    });
    console.log(token);
  }

  return(
    <div
      className="wrapper"
      style={{
        display: 'flex',
        alignItems: 'center',
        justifyContent: 'center',
        height: '100vh',
        flexDirection: 'column',
      }}>
      <h2>User Registration</h2>
      <form onSubmit={handleSubmit}>
        <label>
          <p>Email</p>
          <input type="text" onChange={e => setEmail(e.target.value)}/>
        </label>
        <label>
          <p>Password</p>
          <input type="password" onChange={e => setPassword(e.target.value)}/>
        </label>
        <div>
          <button type="submit">Submit</button>
        </div>
      </form>
    </div>
  )
}
Now lets hook up our page component into our router.
import './App.css';
import Login from './components/Login';
import {
  BrowserRouter,
  Routes,
  Route,
} from 'react-router-dom';

function App() {
  return (
    <div className="wrapper">
      <BrowserRouter>
        <Routes>
          <Route path="/login" element={<Login/>} />
        </Routes>
      </BrowserRouter>
    </div>
  );
}

export default App;

Our registration page is now available under /register.
This component submits a POST request to /authentication/local/new containing our user-specified email and password fields.
Bring up your development tools' console and pay attention to the response object.
The server's response contains our newly created user object.
{
    "user": {
        "email": "[email protected]",
        "active": true,
        "isVerified": false,
        "hasTwoFA": false,
        "createdAt": "2022-07-22T07:38:31.324Z",
        "updatedAt": "2022-07-22T07:38:31.324Z",
        "_id": "62da53f7c28d4156aac93f22",
        "__v": 0
    }
}
User Login
The first thing our users are going to do after registering is log in.
Let's make a React component mapped to the /login path.
import React, { useState } from 'react';

const PORT = process.env.CONDUIT_CLIENT_PORT ?? 3000;

async function loginUser(credentials) {
  return fetch(`http://localhost:${PORT}/authentication/local`, {
    method: 'POST',
    headers: {
      'Content-Type': 'application/json',
    },
    body: JSON.stringify(credentials),
  })
    .then(data => data.json());
 }

export default function Login() {
  const [email, setEmail] = useState();
  const [password, setPassword] = useState();
  const handleSubmit = async e => {
    e.preventDefault();
    const token = await loginUser({
      email,
      password,
    });
    console.log(token);
  }

  return(
    <div
      className="wrapper"
      style={{
        display: 'flex',
        alignItems: 'center',
        justifyContent: 'center',
        height: '100vh',
        flexDirection: 'column',
      }}>
      <h2>User Login</h2>
      <form onSubmit={handleSubmit}>
      <label>
        <p>Email</p>
        <input type="text" onChange={e => setEmail(e.target.value)}/>
      </label>
      <label>
        <p>Password</p>
        <input type="password" onChange={e => setPassword(e.target.value)}/>
      </label>
      <div>
        <button type="submit">Submit</button>
      </div>
    </form>
    </div>
  )
}
Let's set up our route.
Add the following lines into the Routes section of your App.js file:
        // ...
        import Login from './components/Login';
        import Register from './components/Register';
        // ...
        <Routes>
          <Route path="/login" element={<Login/>} />
          <Route path="/register" element={<Register/>} />
        </Routes>
        // ...
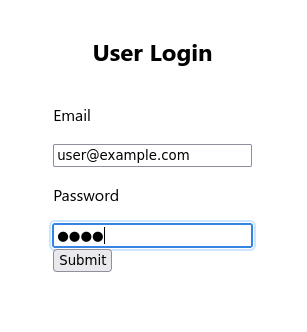
Our login component is now accessible through /login.
Our component submits a POST request to /authentication/local containing our user-specified email and password fields.
The server's response contains our user's id, as well as a pair of access and refresh tokens to be used for our user authenticated application routes.
{
  "userId": "6242f1bb10a09901827738fe",
  "accessToken": "eyJhbGciOiJIUzI1NiIsInR5cCI6IkpXVCJ9.eyJpZCI6IjYyNDJmMWJiMTBhMDk5MDE4Mjc3MzhmZSIsImlhdCI6MTY0ODU1NDUyNywiZXhwIjoxNzM0OTU0NTI3fQ.Fjqa7ORBBF2giwG7OgiWr2HMgHDL7R6ddFq2E730Djc",
  "refreshToken": "BsKhe3ARhL/FfDfK1REphKkkqQaxRCj/LvvRHOg5wCXCBaUSOwafRHyFYIttaORY/NmHS7NAuT6+knBQegVOwQ=="
}
Having obtained our user's authentication token, we are ready to perform our first user-authenticated requests.
Let's introduce another React component responsible for schema document creation so that our users can start registering new movie entries.
Creating Movies
Our application is going to allow users to create their own movie entries.
The request URI responsible for schema document creation is POST /database/:schemaName, where :schemaName is the name of our schema.
We named our schema Movies, therefore we'll be sending our POST requests to database/Movies.
Let's create our movie creation component.
import React, { useState } from 'react';

const PORT = process.env.CONDUIT_CLIENT_PORT ?? 3000;

async function createMovie(userToken, movie) {
  return fetch(`http://localhost:${PORT}/database/Movies`, {
    method: 'POST',
    headers: {
      'Content-Type': 'application/json',
      'Authorization': `Bearer ${userToken}`
    },
    body: JSON.stringify(movie),
  })
    .then(data => data.json());
 }

export default function CreateMovie() {
  const [userToken, setUserToken] = useState();
  const [name, setName] = useState();
  const [director, setDirector] = useState();
  const [duration, setDuration] = useState();
  const [releaseDate, setRelaseDate] = useState();
  const handleSubmit = async e => {
    e.preventDefault();
    const response = await createMovie(userToken, {
      name,
      director,
      duration,
      releaseDate,
    });
    console.log(response);
  }

  return(
    <div
      className="wrapper"
      style={{
        display: 'flex',
        alignItems: 'center',
        justifyContent: 'center',
        height: '100vh',
        flexDirection: 'column',
      }}>
      <h2>Movie Creation</h2>
      <form onSubmit={handleSubmit}>
        <label>
          <p>User Token</p>
          <input type="text" onChange={e => setUserToken(e.target.value)}/>
        </label>
        <label>
          <p>Name</p>
          <input type="text" onChange={e => setName(e.target.value)}/>
        </label>
        <label>
          <p>Director</p>
          <input type="text" onChange={e => setDirector(e.target.value)}/>
        </label>
        <label>
          <p>Duration</p>
          <input type="number" onChange={e => setDuration(e.target.value)}/>
        </label>
        <label>
          <p>Release Date</p>
          <input type="date" onChange={e => setRelaseDate(e.target.value)}/>
        </label>

        <div>
          <button type="submit">Submit</button>
        </div>
      </form>
    </div>
  )
}
We enabled schema entry creation authentication while configuring our schema's auto-generated CRUD,
hence our frontend application is going to have to provide a Authentication header
containing the user's authentication token, prefixed by Bearer , while submitting movie creation requests.
Your frontend application is responsible for securely storing and passing this along with any authenticated user requests, yet to keep matters simple we're going to provide it through a form in this demo.
It's about time we mapped our component to the router, wouldn't you say?
        // ...
        import Login from './components/Login';
        import Register from './components/Register';
        import CreateMovie from './components/CreateMovie';
        // ...
        <Routes>
          <Route path="/login" element={<Login/>} />
          <Route path="/register" element={<Register/>} />
          <Route path="/movies/new" element={<CreateMovie/>} />
        </Routes>
        // ...
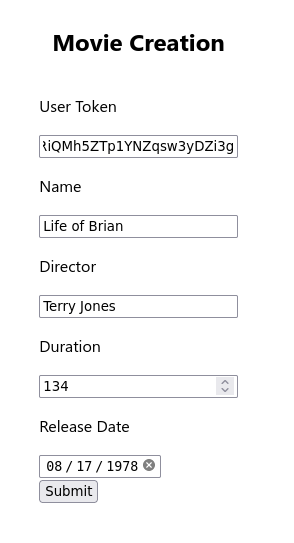
Navigate to /movies/new and create your very first movie!
{
  "name": "Life of Brian",
  "director": "Terry Jones",
  "duration": 134,
  "releaseDate": "1978-08-17T00:00:00.000Z",
  "createdAt": "2022-07-22T10:14:18.819Z",
  "updatedAt": "2022-07-22T10:14:18.819Z",
  "_id": "62da787ac28d4156aac93f5e",
  "__v": 0
}
Listing Movies
Now that our users are capable of registering new movies, let's write one last component responsible for retrieving and rendering our movie entries.
import React, { useState } from 'react';

const PORT = process.env.CONDUIT_CLIENT_PORT ?? 3000;

async function listMovies() {
  return fetch(`http://localhost:${PORT}/database/Movies`, {
    method: 'GET',
    headers: {
      'Content-Type': 'application/json',
      'Authorization': 'Bearer sometoken',
    },
  })
    .then(data => data.json())
 }

export default function ListMovies() {
  const [movies, setMovies] = useState([]);
  const handleSubmit = async e => {
    e.preventDefault();
    const response = await listMovies();
    console.log(response)
    setMovies(response.documents);
  }

  return(
    <div
      className="wrapper"
      style={{
        display: 'flex',
        alignItems: 'center',
        justifyContent: 'center',
        height: '100vh',
        flexDirection: 'column',
      }}>
      <h2>Available Movies</h2>
      <form onSubmit={handleSubmit}>
        <button type="submit">GET MOVIES</button>
      </form>
      <div>
        <ul>
        {
            movies &&
            movies.map((movie) =>
              <li style={{
                display: "flex",
                gap: 2,
                flexDirection: "column",
                padding: 10
              }}>
                <div style= {{ fontWeight:"bold"}}>
                  Name: {movie.name}
                </div>
                <div>
                  Director: {movie.director}
                </div>
                <div>
                  ReleaseDate: {movie.releaseDate}
                </div>
              </li>
            )
          }
        </ul>
      </div>
    </div>
  )
}
Like always, don't forget to map the component to a route.
        // ...
        import Login from './components/Login';
        import Register from './components/Register';
        import CreateMovie from './components/CreateMovie';
        import ListMovies from './components/ListMovies';
        // ...
        <Routes>
          <Route path="/login" element={<Login/>} />
          <Route path="/register" element={<Register/>} />
          <Route path="/movies/new" element={<CreateMovie/>} />
          <Route path="/movies" element={<ListMovies/>} />
        </Routes>
        // ...
Our movie retrieval route is now registered.

Navigate to /movies and click on the GET MOVIES button.
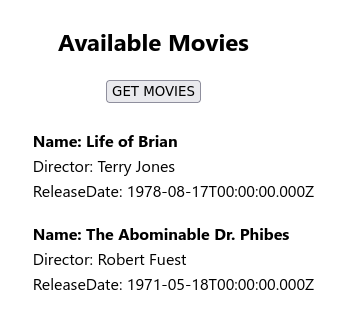
The registered movie documents should be displayed to you.
Conclusion
Our users are now capable of registering an account, logging in using their credentials,
creating their own movies and listing all of the available movie entries.
And thus, our little tutorial is finally over.
Hopefully this should help get you familiarized with the basics of how to communicate with your Conduit backend from your frontend's perspective.