Getting Started
Execution
- CLI
- Docker
# Option A: Just give me a barebones setup of the latest Conduit release (includes Database + Mongo)
npx @conduitplatform/cli deploy

# Option B: I wish to bring up extra modules and perform some basic configuration (select Mongo/Postgres)
npx @conduitplatform/cli deploy --config
Prerequisites
# Set up the Container Network
docker network create conduit

# Start Redis
docker run -d --name conduit-redis \
            --network-alias redis \
            --network "conduit" \
            -h conduit-redis \
            -p 6379:6379 \
            docker.io/library/redis:latest

# Start Conduit
docker run -d --name conduit-core \
            --network-alias conduit \
            --network "conduit" \
            -h conduit-core \
            -p 55152:55152 -p 3030:3030 -p 3031:3031 \
            -e REDIS_HOST="conduit-redis" -e REDIS_PORT="6379" \
            ghcr.io/conduitplatform/conduit:latest
# Start Router
docker run -d --name conduit-router \
              --network-alias router \
              --network "conduit" \
              -h conduit-router \
              -p 3000:3000 -p 3001:3001 \
              -e REGISTER_NAME="true" -e CONDUIT_SERVER="conduit-core:55152" \
              ghcr.io/conduitplatform/router:latest
- MongoDB
- PostgreSQL
# Start MongoDB
docker run -d --name conduit-mongo \
            --network-alias mongo \
            --network "conduit" \
            -h conduit-mongo \
            -p 27017:27017 \
            docker.io/library/mongo:latest

# Start Database
docker run -d --name conduit-database \
            --network-alias database \
            --network "conduit" \
            -h conduit-database \
            -e REGISTER_NAME="true" -e CONDUIT_SERVER="conduit-core:55152" \
            -e DB_TYPE="mongodb" \
            -e DB_CONN_URI="mongodb://conduit-mongo:27017" \
            ghcr.io/conduitplatform/database:latest
PosgreSQL is fully supported, but not yet recommended.
If you're deploying to production, we recommend sticking with MongoDB.
# Start PostgreSQL
docker run -d --name conduit-postgres \
            --network-alias postgres \
            --network "conduit" \
            -h conduit-postgres \
            -p 5432:5432 \
            -e POSTGRES_USER="conduit" \
            -e POSTGRES_PASSWORD="pass" \
            -e POSTGRES_DB="conduit" \
            docker.io/library/postgres:latest

# Start Database
docker run -d --name conduit-database \
            --network-alias database \
            --network "conduit" \
            -h conduit-database \
            -e REGISTER_NAME="true" -e CONDUIT_SERVER="conduit-core:55152" \
            -e DB_TYPE="postgres" \
            -e DB_CONN_URI="postgres://conduit:pass@localhost:5432/conduit" \
            ghcr.io/conduitplatform/database:latest
At this point, you should have a functional Database instance.
You may now use modules requiring database access or register and manipulate your own custom content through the Admin Panel.
Using the Admin Panel
Lets walk you through some examples on how to utilize the Database module through Conduit's admin panel.
Start by, launching the admin panel and navigating to the Database page.

This module provides content through schemas, schema data and custom endpoints.
Each one of the above is capable of being manipulated through the corresponding tab.
Schemas
Custom content types are expressed as database schemas.
Schemas contain fields of different types. Some of them are optional, while others are required.
Some of them might even take a default value if nothing else is explicitly specified.
A collection of "Persons" is a schema.
A person has certain required characteristics, like a first and last name, as well as a date of birth, but they might also be described by additional ones, like a hairstyle or the list of languages they are capable of speaking
These features need not be required, but ultimately, it's you who decides, depending on your project's needs!
Schemas are often referred to as "collections".
Enough of that intro, show me how I'd go about making one of these bad boys!
Okay, don't push, click on the Create New button in the Schemas tab and lets define our first schema.
A popup should name prompt should be brought up. Insert Persons.

This is the schema modification view. It allows you to create new schemas and edit existing ones.
You may also archive schemas, at which point they won't be available for use anymore.
If you are sure you won't be needing them anymore, you can head to the Archived Schemas tab and permanently delete them.
If you changed your mind, simply enable them again from that same tab.
On the top bar, you can edit the schema's name, generate CRUD routes, and enforce user authentication
to access or modify the schema's data by end users.
You may also modify schema extension permissions.
On the right side, is a selection of available schema fields.
We can use these to structure our data. Here's a short rundown of them:
Text(strings and characters)Number(integers and floating points)DateBooleanEnum(ofTextorNumbervalues)ObjectIdGroupRelation
On the left side, you can see our schema in the making
Notice how schemas come with a unique identifier (_id) and a pair of
creation and modification timestamps (createdAt, updatedAt) out of the box.
Seems pretty plain right now, but don't worry, we'll get to that in a sec.
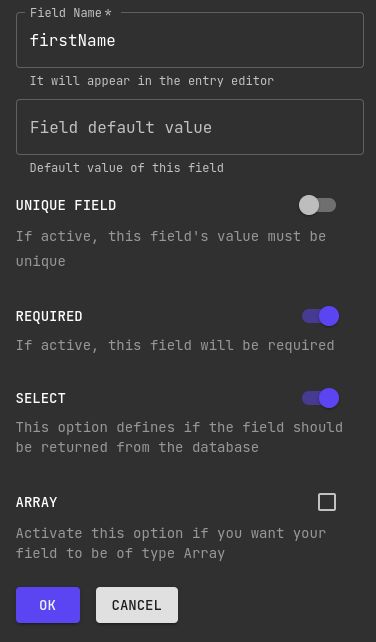
Start by dragging a text field into our schema area. A field modification pane should expand on your right.
Name the field firstName and make it required. A person's name is not unique so we'll not toggle that option.
Leave the select option on, as disabling that would result in the field not being returned from queries.
It's not an array either so leave that off too. Save the field.
Now do the same for a lastName text field.
Lets make a text field for the person's social security number, call it ssn, but this time make it unique!
We're going to add a date field called dateOfBirth, setting it as required.
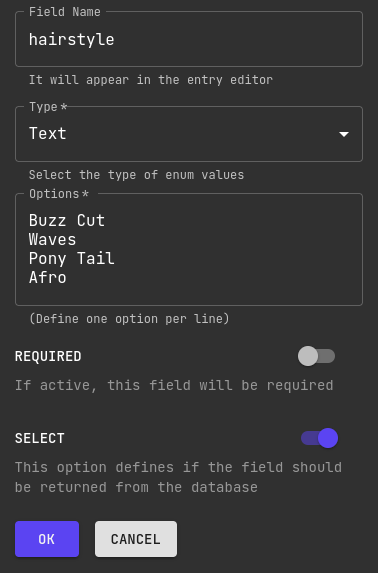
Drag an enum field for our hairstyle and select Text as the enum value type.
Simply list all of the options you wish to support making sure to separate these with new lines.
No separator is required. We don't need make the field required either.
For the person's languages, we'll use another optional text field.
Simply enable the Array option so that our society can be multilingual 💭.
Our schema's fields are complete. If you changed your mind, you can always edit, remove and reorder any of them in the schema field list on the left.
Alright, that wasn't too bad, now how does one fill that schema with data?
There are multiple ways to go about this.
If your schemas enable CRUD endpoints, you can simply use our automatically generated
REST and GraphQL API endpoints
to retrieve and manipulate data from your application.
This is how you'd register data based on user input and third party APIs.
We don't seem to have any users yet, so we are simply going to make use of the admin panel to register some data ourselves 💡.
Schema Data
You can register individual entries in a schema to store your data.
Example:"James" is a unique person in a collection of "Persons".
Their `lastName` is "Jones" and they may or may not rock a buzz cut `hairstyle` this year 🤫.
Data entries are often referred to as "schema documents".
We already have a schema to store our persons in. Lets use it to register James as an individual person.
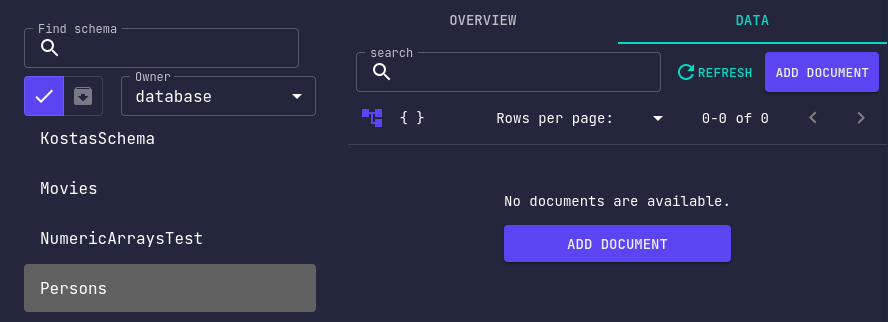
On the left side, there's a list of registered schemas for us to manipulate the data of.
Archived schemas won't show up in the list, so make sure your schemas are enabled before attempting to modify their data.
On the right side you can all of the data stored for the selected schema.
Or at least you would be seeing that if we had any data 🤔. I swear, it's not broken!
Select Persons from the schema list and click on Add Document.
You'll get a popup window allowing you to enter the details for the new person.
Required fields are prefixed with an asterisk *.
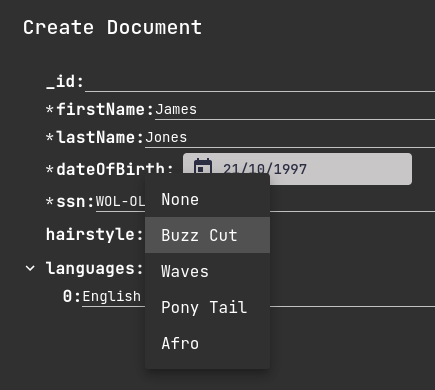
I'm going to name that person James Jones, but you can use any values you like.
When you're done, click create and watch how our first person appears in the documents list.
Try hovering over the newly created document. You'll notice 2 buttons popping up on the right.
You can use these to edit and delete individual documents.

By now, you might have noticed the mode buttons below the document search bar.
Switching to the the query view mode lets you browse and modify your data in JSON using an editor element.
Pretty cool, right? No? Oh well, guess that's just me.
Guided Examples
Looking for additional examples on how to use the Database module?
Check out the available tutorials!